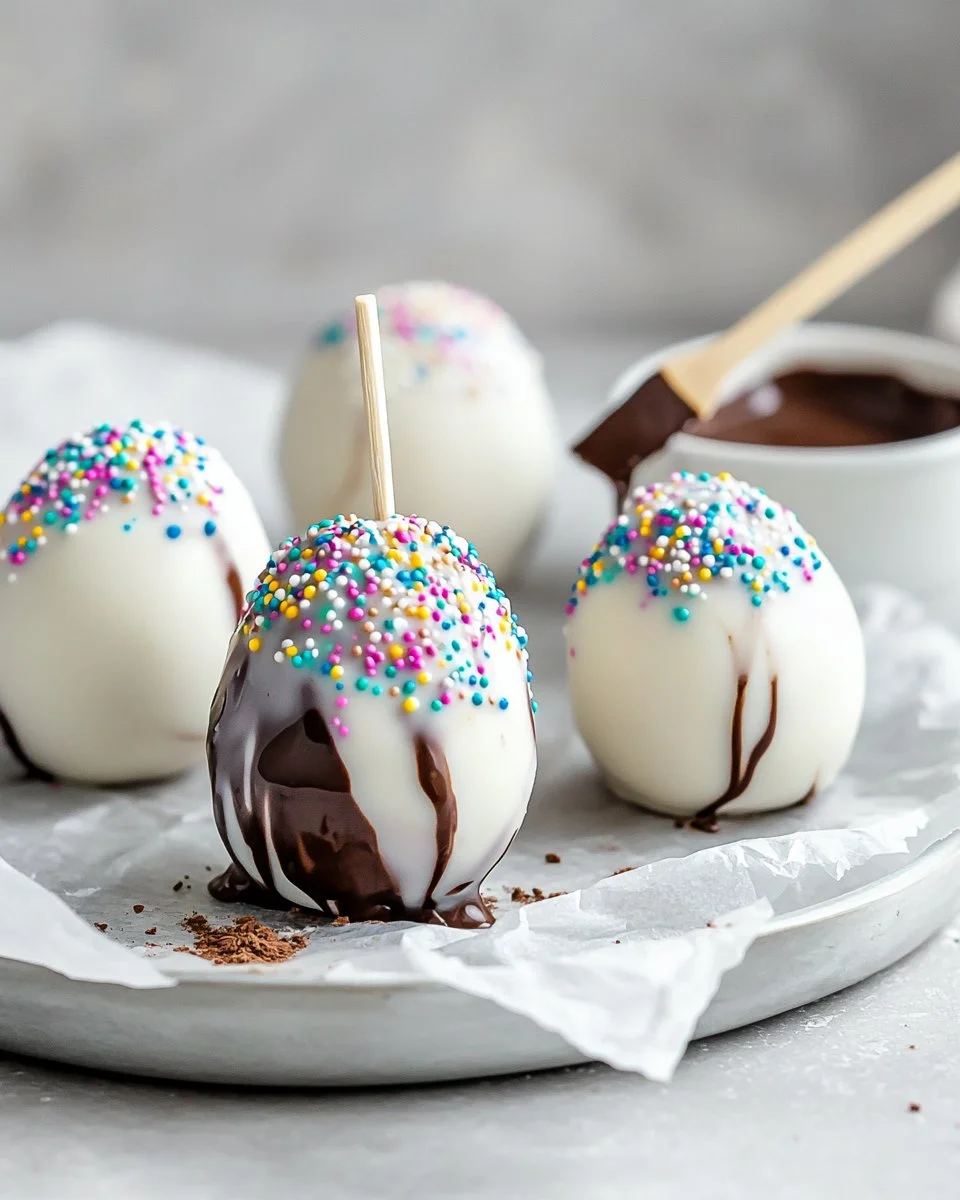
Peanut Butter Easter Eggs
There’s something special about the sounds and smells filling a family kitchen on a cozy afternoon. Picture this: kids laughing as they set the table, the delightful aroma of peanut butter wafting through the air, deliciously mixed with notes of sweetness and chocolate. Right there, amidst the clatter and chatter, we find joy in creating something together. As we gather around the dining table, the moment comes alive when we share a treat that sparks conversation and connection, like Peanut Butter Easter Eggs. This treat is not only a delightful recipe but also a way to bring family and friends closer together through shared flavors and traditions.
Why This Peanut Butter Easter Eggs Feels Like Home
Every home has its flavors, its aromas that evoke memories of special moments. For me, peanut butter easter eggs are a bridge to my childhood. I can vividly remember gathering in my grandmother’s kitchen, cheeks smeared with chocolate as we all took part in making our festive treats. The excitement was palpable, and the laughter rang out like music.
Peanut Butter Easter Eggs have a way of creating those delightful memories too. The creamy peanut butter filling, combined with a sweet coating of chocolate, is nostalgic and inviting. This recipe fits right in, whether for Easter celebrations or any joyous family gathering. It offers comfort and a chance to bond through cooking, making it a must-have in our household. You might just find it becomes a family favorite in your home too.
Why Peanut Butter Easter Eggs is Our New Family Favorite
These Peanut Butter Easter Eggs are not just a dessert; they are a celebration on a plate. The recipe is casual yet special, allowing us to get creative while keeping cooking simple. As we whip up these sweet bites, the hustle and bustle of the day seem to fade away, and all that matters are the smiles around our table.
In these busy times, we seek recipes that come together quickly and easily, keeping the stress low but the flavor high. This recipe allows us to involve everyone, from the smallest helpers who can shape the eggs to the older kids who can take charge of dipping everything in chocolate. When we share the joy of making something together, food becomes a love language in our home.
The Simple Magic Behind Peanut Butter Easter Eggs
It’s remarkable how simple ingredients can create something so delicious. The heart of this recipe is naturally runny peanut butter, which provides a creamy texture. Paired with the right amount of sweetness from maple syrup, and the slight nuttiness from almond flour, it creates a filling that is rich and satisfying.
What sets this dish apart is the balance of flavor and texture. The chocolate coating hardens around the soft filling, creating a lovely contrast. When you bite into the egg, you experience the crunch of chocolate followed by the creamy, sweet center. It’s like a little surprise, turning the act of eating into an enjoyable experience.
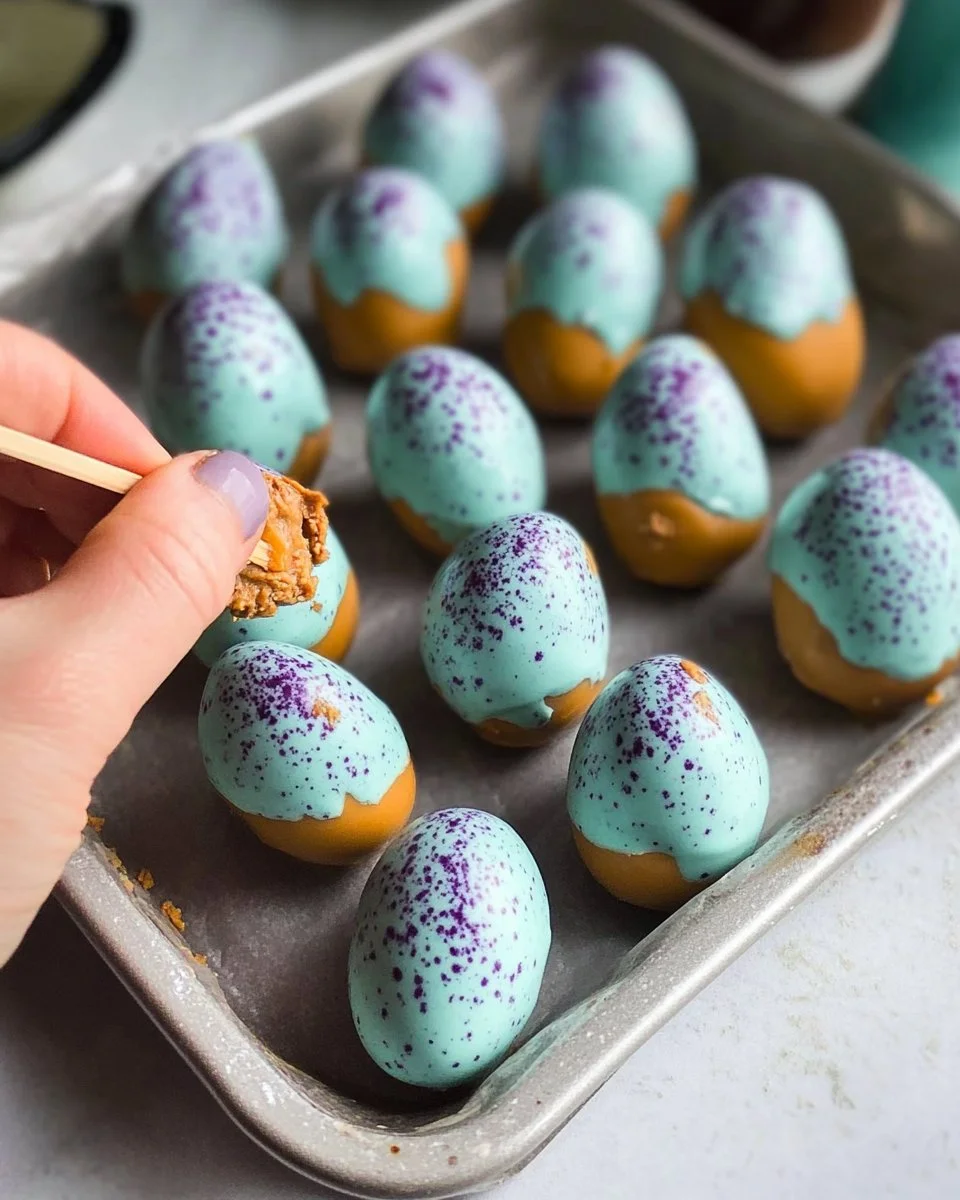
Let’s not forget the beautiful colors we can achieve with minimal effort. A dash of blue spirulina and matcha powder allows us to create festive hues, transforming these treats into delightful visual feasts. When kids help with the colors, it’s all the more fun, allowing them to express their creativity while creating lasting memories.
How to Make Peanut Butter Easter Eggs, The Heartwarming Way
Making Peanut Butter Easter Eggs is a straightforward process that lets you focus on the heart of cooking—creating together. Here’s a quick overview of our steps:
-
Mix the Filling: We start by bringing the ingredients together in a large bowl. The textures change as we mix, guiding us through the intuition of rightness.
-
Shape the Eggs: Divide the filling into portions and shape them into ovals. This is where it gets fun! Each egg takes on a personality as kids shape them into their own creations.
-
Create the Coating: While the filling chills, we melt the chocolate. This is the moment where aromas fill the kitchen, and the anticipation grows.
-
Coat the Eggs: Dipping the chilled eggs into the chocolate coating is a playful task. It’s a messy process, but it’s all part of the joy.
-
Add the Finishing Touches: Finally, the cocoa speckles make our eggs look even more magical. It’s where we get to experiment and make them uniquely ours.
“This is where the magic happens—when the aroma fills the kitchen and my kids come running in, asking ‘Is it ready yet?’”
By following these steps, you create not just food but memories, laughter, and shared moments. The colors, textures, and aromas come together to bring joy to the cooking process.
Ingredients You’ll Need
Gathering our ingredients is where the fun starts, and it’s quite simple. Here’s what you need for these delightful eggs:
- 1 1/4 cup natural, runny peanut butter (no sugar added)
- 1/4 cup maple syrup
- 1/4 cup powdered sugar
- 1/3 cup almond flour
- 1/2 teaspoon vanilla extract
- Pinch of salt
- 8 ounces white chocolate melting wafers (I’ve always loved Ghirardelli brand)
- 2 teaspoons coconut oil
- 1/2 teaspoon blue spirulina + 1/4 teaspoon matcha powder (or use a 2:1 ratio of any blue and green food dye)
- For the speckles: 1 teaspoon cocoa powder + 1 tablespoon water
Don’t hesitate to make this recipe your own! You can switch maple syrup for honey or use crunchy peanut butter if that’s what your family loves best. Cooking ought to be about using what you have on hand, making it accessible yet delightful.
Step-by-Step Directions
Let’s get cooking! Here are the clear, friendly steps to whip up your Peanut Butter Easter Eggs:
-
Mix the Filling: In a mixing bowl, beat together the peanut butter, maple syrup, powdered sugar, almond flour, vanilla extract, and salt until well combined. It should have a smooth texture.
-
Shape the Eggs: Portion the peanut butter filling into 2-tablespoon portions. Roll each one into a ball using your hands, then gently shape each ball into an oval (egg-shaped).
-
Prepare for Freezing: Place the shaped eggs on a parchment paper-lined baking sheet and freeze while you prepare the coating. This helps them hold their shape when dipped.
-
Make the Cocoa Mixture: In a small bowl, whisk together the cocoa powder and water and set it aside. This will give our eggs a lovely speckled look.
-
Melt the Chocolate: Add the white chocolate and coconut oil to a microwave-safe bowl. Microwave in 15-20 second intervals, stirring well between each interval until fully melted. Whisk in the spirulina and matcha (or food coloring) and adjust the colors as desired.
-
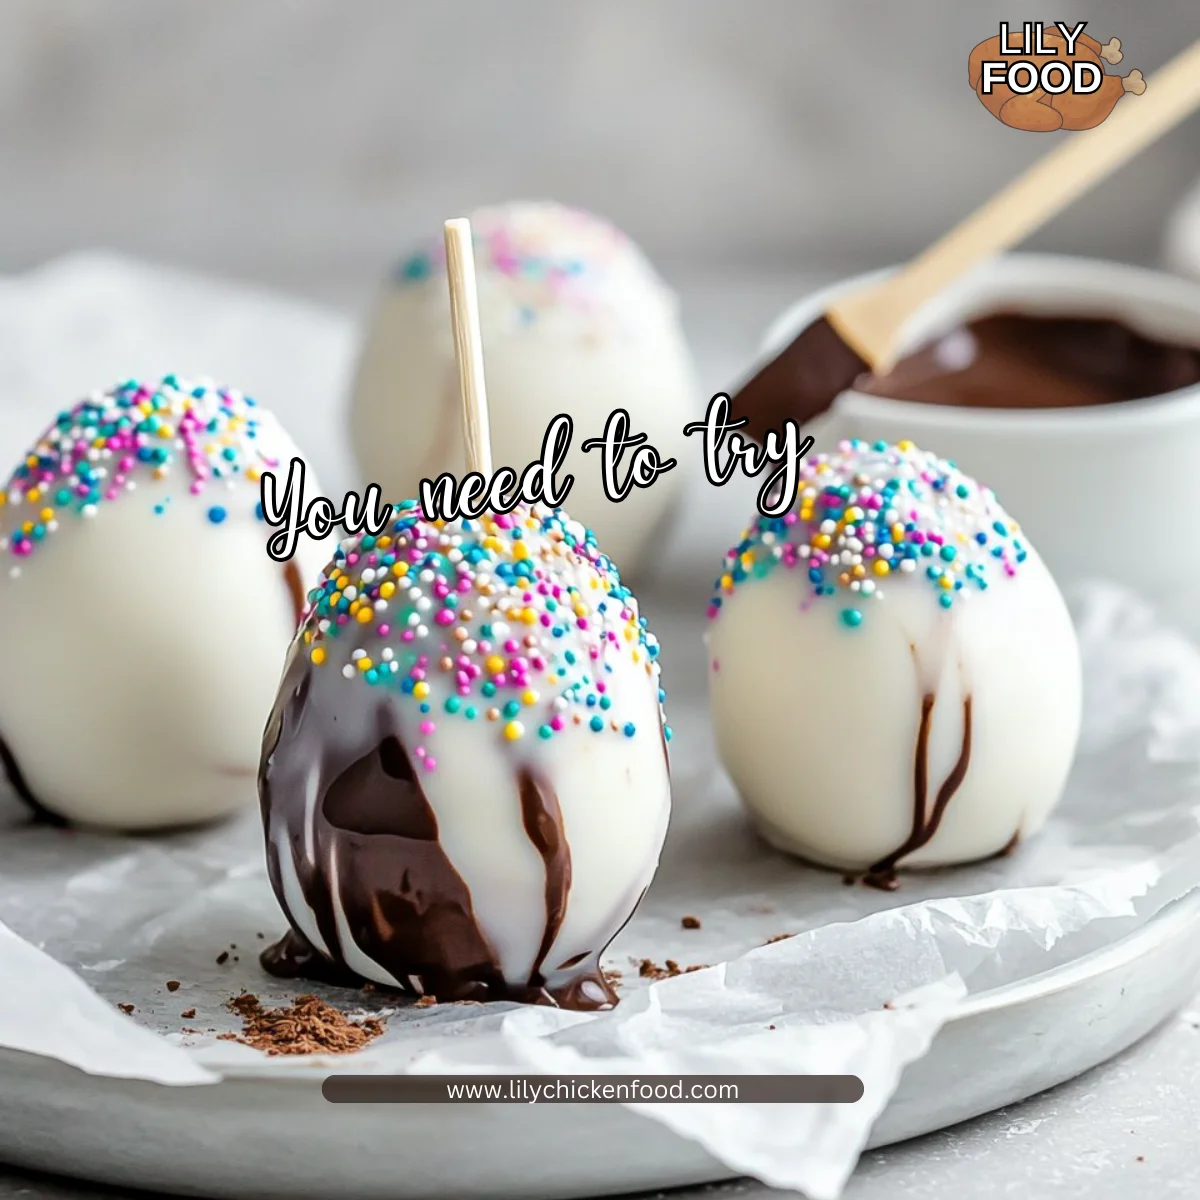
Dip the Eggs: Coating the eggs works best when they are semi-frozen. This helps the white chocolate coating firm up quickly. Stick a toothpick in the bottom of an egg, then dip it in the white chocolate. Let the excess chocolate drip off, and wait until the white chocolate is mostly hardened before returning to the parchment paper. Remove the toothpick at this point; if you wait too long, the chocolate coating may crack.
-
Add the Speckles: To make the speckles, dip a pastry brush in the cocoa powder/water mixture. Holding it about 8 inches above the baking sheet, flick the tip of the pastry brush over the eggs to create speckles. Be careful; this part can get messy, so wear an apron!
-
Chill: Refrigerate until the chocolate hardens, roughly 10 minutes, and get ready to enjoy!
Each step is crucial, but remember to have fun with it. If the kids want to get involved or make a mess, let them—it’s all part of the experience.
Serving Peanut Butter Easter Eggs with Love
When it’s time to serve, these Peanut Butter Easter Eggs shine on their own or as part of a larger spread. At our table, we love to place all the eggs on a beautiful platter in the center. It quickly becomes the star of the meal!
Sometimes, we serve it alongside fresh fruits or a light salad. The contrast of the sweet chocolate eggs with tart strawberries or crisp greens creates a delightful balance. Each person can take what they like, making it a fun, family-style event.
My kids love sharing their favorites—the crunchy bites filled with peanut butter or the melted chocolate coating. It fosters conversation and laughter as we each take our time enjoying the moment. The kitchen, filled with warmth and laughter, becomes a sanctuary for cherished memories.

Storage & Reheat Tips
Once you’ve indulged in these delicious Peanut Butter Easter Eggs, how do you keep the joy alive? Storing leftovers properly is key to maintaining their flavor and texture.
To store: Simply place them in an airtight container and keep them in the refrigerator. They can last for up to a week, though they rarely stick around that long!
If you’re looking to enjoy them later in the week, you can also freeze the eggs before coating them in chocolate. Just remember to let them thaw in the fridge before coating for optimal taste.
For reheating, if necessary, the microwave can work fine for a quick sweet fix. However, if you want that just-made warmth, pop them in the oven at a low temperature for a few minutes. That way, they regain their delightful texture.
My Kitchen Notes & Shortcuts
As someone who loves to share my kitchen wisdom, here are a few nuggets from my own experience with Peanut Butter Easter Eggs:
- Chilled Ingredients: Ensure your peanut butter is at room temperature for easier mixing.
- Color Experimentation: Get playful with natural color dyes; beet juice for pinks or turmeric for yellows can be fun twists.
- Batch Preparation: Double the recipe and freeze the extras for emergency treats that are always ready to go.
- Kids in the Kitchen: Let kids roll the eggs; it’s a great way to get them involved and they’ll love their unique shapes!
- Easy Cleanup: Prepare a messy station with newspaper or parchment paper underneath, making cleanup a breeze.
These tips enable you to enjoy less stress in the kitchen while maximizing flavor and fun.
Family-Friendly Variations
As you settle into making your Peanut Butter Easter Eggs, don’t hesitate to make it your own. Here are a few ideas for variations that my family loves:
- Nut Variations: Swap out almond flour for crushed graham crackers for a fun, crunchy texture.
- Flavor Twists: Consider adding a splash of almond extract or coconut flavor to the peanut butter filling.
- Chocolate Variety: Use dark chocolate instead of white for a richer taste or try a milk chocolate for a classic, sweeter variant.
- Fresh Add-Ins: A sprinkle of mini chocolate chips or your favorite nuts can provide a delightful crunch to the filling.
Encourage your family to express their creativity in the kitchen. Every alteration can add to the richness of your family traditions—it’s all about personalizing your experience.
FAQs About Peanut Butter Easter Eggs
Can I make this ahead for a busy week?
Absolutely! In fact, letting them sit in the fridge for an hour allows the flavors to meld beautifully.
How long do these eggs last?
When stored properly in an airtight container, they can last up to a week in the refrigerator. If you freeze them, they will keep much longer.
What if I have nut allergies?
You can definitely adapt the recipe by swapping peanut butter for sunbutter or any seed butter. It may change the flavor slightly, but it’ll still be delicious!
Can I use regular chocolate instead of white?
Of course! Regular chocolate will give a darker flavor, and it pairs wonderfully with the peanut butter filling.
What can I serve them with?
These eggs shine on their own, but serving them alongside fresh fruit or a light dessert platter always creates a delightful experience.
One Final Thought from My Kitchen
I hope this recipe finds its way into your family’s kitchen, instigating laughter and love during the cooking process. Cooking is not just about feeding; it’s about creating experiences and memories. If these Peanut Butter Easter Eggs bring joy, I believe my grandmother’s spirit is living on in our kitchens. Until next time, happy cooking!

Peanut Butter Easter Eggs
Ingredients
Method
- In a mixing bowl, beat together the peanut butter, maple syrup, powdered sugar, almond flour, vanilla extract, and salt until well combined.
- Portion the peanut butter filling into 2-tablespoon portions. Roll each one into a ball using your hands, then gently shape each ball into an oval.
- Place the shaped eggs on a parchment paper-lined baking sheet and freeze while you prepare the coating.
- In a small bowl, whisk together the cocoa powder and water and set it aside.
- Add white chocolate and coconut oil to a microwave-safe bowl. Microwave in 15-20 second intervals, stirring well until fully melted. Whisk in spirulina and matcha to adjust colors as desired.
- Dipping the eggs works best when semi-frozen. Stick a toothpick in the bottom of an egg, dip it in the white chocolate, letting excess chocolate drip off.
- Wait until the white chocolate is mostly hardened before returning to the parchment paper and removing the toothpick.
- Dip a pastry brush in the cocoa powder/water mixture and flick the tip over the eggs for speckles.
- Refrigerate until the chocolate hardens, roughly 10 minutes, and enjoy!